Microsoft Office 2010 programs have always been the most popular productivity software that is used by majority of the world population. Microsoft word has been one of the most useful ones and it provides a wide range of functionality and purposeful uses.
Microsoft Word 2010 is the most recent Word processing program and it is one of the mostly used one of the Microsoft Office Pack. Microsoft Word 2010 is highly sophisticated and it is used for composing letters, reports, academic papers, references, CVs, essays, term papers, articles, novels and many other things. You can print out what you produce, design it to make more attractive, add pictures, tables and list fact and figures by using graphics. You can save the word office document you have produced on the hard drive for later use or to edit further in future.
Using Microsoft Word 2010 for composing texts is very handy because it has many features that make the process quick and rather easy. With Microsoft Word 2010 you can actually not only compose text but also create tables, write academic papers and insert references, tables of contents etc. with the References tab of Microsoft Word 2010. Additionally new features of Microsoft Word 2010 will be making everything a lot easier for both new and expert users.
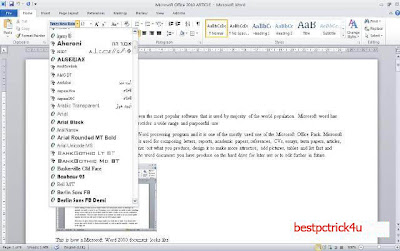
This is how a Microsoft Word 2010 document looks like on our monitor display.
Getting Started with Microsoft Word 2010
If you are new to Microsoft Word 2010, you should definitely note that it is not a difficult task to get the hang of it. If you have used a prior version like MS Word 2010, then the shift to 2010 Word edition will be piece of cake. First of all you should know how to get started and to do this you will have to go to the Start menu and then to All Programs which should be followed by Microsoft Office and finally Microsoft Word 2010.
Here is the route to follow to get started with Microsoft Word 2010:
Start  All Programs
  Microsoft Office
  Microsoft Word 2010
This is how you can open a new Microsoft Word 2010 document.
If you require using Microsoft Word 2010 frequently you can also place the 2010 Word icon on the Start menu and this way you can have a better, easier and quicker access to the application. In order to place the Microsoft Word 2010 icon in the Start Menu all you have to do is to follow the route stated above and drag Microsoft Word 2010 to the start menu. You can also do this by right clicking on the Microsoft Word 2010 icon and selecting Pin to Start Menu and it will be placed on the start menu for you to start creating and editing professional looking documents and many more.
Here is the route to follow to place the Microsoft Word 2010 icon in the Start Menu:
Start Menu  All Programs
  Microsoft Office
  Microsoft Word 2010
  (right click) Pin to Stat menu
This is how you can place/pin the Microsoft Word 2010 icon to the Start Menu.
tarting to use Microsoft Word 2010
Once a new Microsoft Word 2010 Document is ready you can start composing your letter, report, essay, term paper etc. However first of all, it is useful to know what is available in Microsoft Word 2010 Ribbon and Office Button.
File Button of Microsoft Word 2010
The Office button which was present in the Microsoft Word 2007 is called File Button within the Microsoft Word 2010. The File Button has the following Save, Save As, Open, Recent, New, Print, Save & Send, Help, Options and Exit icons. On the right hand side you can view detailed information about the document such as its size, number of pages, so on and so forth.
The Microsoft Word 2010 File tab and its contents are shown below.
The Ribbon of Microsoft Word 2010
The Microsoft Word 2010 Ribbon, which is the place where the toolbar contents are placed, is very handy and will provides a quick and easy access to the most frequently used icons of Ms Word 2010. There are the File, Home, Inset, Page Layout, References, and Mailings, Review and View tabs in the Ribbon on 2010 Word. Each tab also has several groups to organize and provide a better use of the Microsoft Office 2010 featrues. The Home tab has Clipboard, Font, Paragraph, Styles and Editing groups. Insert tab has Pages, Tables, Illustrations, Links, Header and Footer, Text, Symbols groups, the Page Layout Tab houses the Themes, Page Setup, Page Background, Paragraph and Arrange groups.
Microsoft Word 2010 also has References tab which consists of Table of Contents, Footnotes, Citations and Bibliography, Captions, Index and Table of Authorities and this tab is absolutely perfect for those who are working on a research paper, essay, and term paper or similar formal documents. Review, Mailings and View are also other three handy tabs of Microsoft 2010 Word that have several groups within themselves and all these are actually available with the Microsoft Word 2010 to help you complete your composing tasks easily and quickly.
With MS Word 2010 there is also Quick Access Toolbar which has a save, undo Repeat Typing button and Customize Quick Access drop down list. Within the list there are New, Open, Save, E-mail, Quick Print, Print Preview and Print, Spelling & Grammar, Undo, and Redo, Draw Table, Open Recent File icons. You can also choose to show the Quick Access Toolbar below the Ribbon by choosing Show below the Ribbon selection and you can also customize further with the More Commands button and make Microsoft Word 2010 suitable to your preferences and needs. In such a manner Quick Access Toolbar of MS Word lets you performance routine tasks much faster.
The Microsoft Word 2010
Quick Access toolbar and its functionality is shown below.
Ribbon of MS Excel 2010
This is how you can edit your composed text via the
Home tab which houses the Clipboard, Font, Paragraph, Styles and Editing groups on Microsoft Word 2010.
Spelling and Grammar Checker of Microsoft Word 2010
Once you have composed and edited the text of your Microsoft Word 2010 document, you can also check the spelling and grammar of the composed text to make sure that there are no mistakes. The Spelling and Grammar tool is placed in the Review tab of 2010 Word within the Proofing group which also homes the word count, thesaurus and research icons. The Spelling and Grammar option is also placed in the Status Bar which is the bar at the most bottom of the Microsoft Word 2010 document. If there is a tick showing at the bottom of the Microsoft Word 2010 document, on the status bar, this means that there is no proofing error and your text is free of any mistakes. If there are some errors then there will be a red cross on the bottom and you can correct the errors by clicking on the red cross. Also the proof error words or sentences would be underlined with a red colour and you can simply right click on it to correct them. This is a familiar feature from the previous models of Word like 2007 and the Microsoft word 2003.
Shown below is where the Spelling and Grammar Checker of Microsoft word 2010 is located.
Extras of Microsoft Word 2010
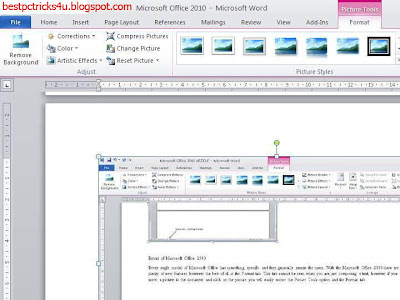
Every single version of Microsoft Office has something new and specific which generally amazes the users. With the Microsoft Word 2010 there are plenty of new features, however the best of all is the Format tab. This special feature tab of Microsoft Word 2010 cannot be seen when you are just composing a text, however if you insert a picture to the document and click on the picture you will easily notice the new Picture Tools option and the Format tab of Microsoft Word 2010.
This is how the Picture tools and the Format tab and its groups look like on our computer display.
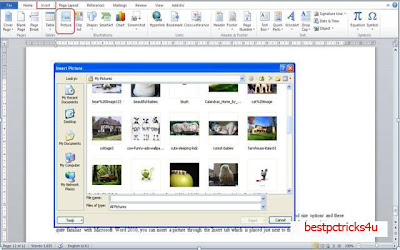
Here is the route to follow to insert a picture in Office Word 2010:
Insert  Picture
  Select a Picture
  Insert
This is how inserting a picture to Microsoft Word 2010 document window looks like.
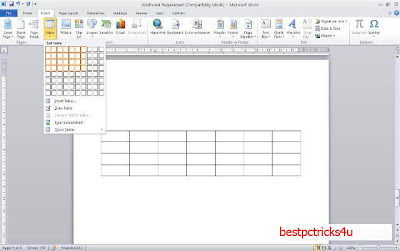
Should you require using a table in your Microsoft Word 2010 document that you are working on, then you can simply use the same insert button and by clicking on Table group you can insert a table with as many columns and rows as you require to use. After adding the table to Microsoft Word 2010 document, you can fill it in with data and you can also format the data and the table, such as its borders and colours to make it even more professional and catchy in just a few seconds.
The route to follow to insert a table to the Microsoft Word 2010 Document
Insert  Table
Table  Select the rows and the columns by moving the mouse
  Click to insert
This is how a table is added to a Microsoft Word 2010 document.
Once you have inserted the picture to the Microsoft Word 2010 document, click on the picture and then click on the Format tab which appears in a pink colour with a Picture Tools option. There you can see frames that you can select to format the picture you have inserted. It is also possible to change the position of the text and this too is a little different from the previous Microsoft Word Programs. There is also an option with Microsoft Word 2010 that enables you to remove the background to give a better appearance to your picture and overall document. The Size and the Adjust groups enable you to change the picture according to your preferences and requirements and these are only a few of the new features of Microsoft Word 2010.
Overall this was just a basic look to the Microsoft Word 2010 to enable users to get familiar with its components and usage. Once you have gone through this guidance you can simply start exploring Microsoft Word 2010 and start composing you letters, essays, reports, documents and many other things easily and quickly.
 - Right click on the desktop and hover on “Arrange Icons By”.

 - Right click on the desktop and hover on “Arrange Icons By”.


